Thursday, April 5, 2012

Grilled Peanut Butter & Jelly Sandwich

The Leaning Tower of Awesomeness awaits you.  Behold: the Grilled-Whole- Wheat-Peanut-Butter-Black-Plum-Jam-Apple Sandwich. 

In this blog, I try to bring you not just different recipes for jam, jelly, and other canning sensations, but also fun ways to use them.

And is there a more simple, tasty, wholesome, take-you-back-to-your-childhood way of eating jam or jelly than in a peanut butter sandwich?  Not really.

But I did change it up for us grown-ups, and kids will love it, too.  I promise.

This recipe is for one sandwich.  I trust you can do the math to double, triple, quadruple. 

You will need:  Small frying pan; 2 slices whole wheat bread; 1/2 apple, thinly sliced (not in wedges, but keeping the apple shape from top to bottom); 1 Tbsp. peanut butter;  1 pat real butter, unsalted and softened; and 1-2 Tbsp. jam (I used Pacific Coast Black Plum Jam that I made back in September).

Smear peanut butter and jam on one slice of the bread.  On the other piece of bread, very thinly smooth 1/2 pat of butter on one side.  Place the slice with butter in your pan, butter side touching the pan.  Arrange apple slices on the slice of bread in the pan.  Now, flip the slice of bread that has the peanut butter and jam on top of the slice in the pan.  Lightly spread the remaining butter on top of this slice of bread.  If you follow the above directions exactly, you won't have to ever place a slice of bread with butter or peanut butter on a plate or counter.  Less mess!  Okay.  Now, turn on your stove burner to low heat.  Be patient, wait for butter to begin melting in pan.  Flip sandwich over, melt butter on that side.  Flip again, wait *about* 2 minutes, check to see that the bread is golden brown, flip again and toast the other side to a golden brown.  Enjoy with a smile and a glass of milk.  I am giddy with my culinary prowess. xo, AB

Saturday, March 24, 2012

Farm Fresh to You CSA Boxes

Organic sweet potatoes, artichokes, lemons, Braeburns, kale, lettuce, celery, spinach, & oranges from a February shipment
Sauteed Spinach and Leeks, Grilled Radicchio Salad with Sherry-Mustard Dressing, Orange-Ginger Chicken and Veggies - just a few of the recipes that come in the amazing little box of organic fruits and veggies that come to my door every Tuesday.  Nothing has changed my health, my lifestyle, or the way I cook (and how much I cook) more than making the decision to sign up for a CSA Box.  I can't say enough about the return on investment for taking part in Farm Fresh to You's  delivery service. 
Chard, lettuce, green apples, kiwi, radishes, white onion, potatoes, carrots, fresh rosemary, & celery from a January box
I have written about CSA farms before, but I feel it necessary to post about them again because I get so many questions about them through my blog and in everyday conversation.  "CSA" stands for Community Supported Agriculture.  CSAs are locally-based farms that produce mostly organic, in-season, and diverse fruits and vegetables, and rely on the local community to purchase directly from them.  Some CSAs also produce eggs, beef, honey, dairy, flowers, and other goodies. There are several different types of distribution and business models, and the primary benefit is that they deliver directly from the farm to your door in the 'Burbs or city. 
Romaine, celery, heirloom tomatoes, grapes, beets, cauliflauer, plums, pears, & chard from a Fall delivery
I found Farm Fresh to You at a booth at a food festival in Santa Monica last Fall, signed up on the spot, and have been in love ever since.  Normally, I find myself sniffling and sneezing all Winter-long; this year I made it all the way to March before I got sick (and I blame this on a serious travel schedule for work).  If I'm feeling a bit sluggish from lack of sleep, poor eating, or too much wine, I whip up a fruit & greens smoothie and feel much better. 


I love the newsletter that accompanies each box; the author, 'Thaddeus,' may not know how much I have learned from his dreamy musings.  I grew up in a farming and gardening haven in Southern Idaho and there are definitely challenges to organic farming that I never would have thought about without this newsletter.  He makes me want to move to an organic farm and leave Hermosa Beach, L.A., and all of the smog and humans behind.  But with their wonderful service, I don't have to give up the beach and I can still eat like a queen.  Also in this newsletter are amazing recipes, great recommendations for cookbooks and cooking websites, and a list of what you received in your box.  And I am not embarassed to say that I definitely need this list ~ almost every delivery includes a wonderful surprise piece and I have no idea what it is.

If you are interested in learning more about CSAs and finding one that suits you, here are some websites to help you out:
2012 CSA Farm Directory
USDA Information
Local Harvest - lots of great information

Still not convinced?
Note that this is 1995, pretty outdated in scientific terms; my guess is that conventional isn't all that bad, and organic isn't the panacea of minerals this shows it to be...but you get the point!
Consider this: 
  1. Fresh, organic produce has more nutrients per serving than grocery-store fresh. 
  2. If you think the cost is expensive, $25 every two weeks provides me with all of the produce in the photos above.  I have a $15 co-pay for every doctor visit, not to mention meds, cough syrup, lost productivity, Kleenexes, etc.  I think I have made my ROI on this purchase!
  3. The TASTE is so much richer, and fuller.  Sure, sometimes you get small, funny-looking produce, but who cares if it tastes better and you know it wasn't manufactured to be uncharacteristically large, shiny, perfect? 
  4. It's delivered.  It saves me time because I typically go to the grocery store once or twice a month for staples and dry goods, and I go back numerous times for produce...but not anymore.
  5. Known health benefits of reduced risk of heart disease, many cancers, and a host of other health issues.  Organic produce reduces this risk even more.
  6. An improved palate and cooking repertoire.  Impress your friends! ;-)
  7. Extra produce can be PRESERVED for future use so it doesn't go bad.
  8. Extra produce can be SHARED with friends nearby.  I have been known to give away greens when I know I won't be able to eat them on my own before they go bad.
Now...just this week I received my first strawberries of the season.  Enjoying a post- beach volleyball fruit and Greek Yoghurt smoothie.  xo, AB
Gorgeous.  They smell(ed) delicious.  Can't wait for more.
P.S. The little blemish on the strawberry on the front was my fault - I smooshed the lid on.

Thursday, March 22, 2012

Mandarin Orangecello ~ Worth the Wait

  Spring is here! (Officially, when I wrote my post on Tuesday we still had a few hours to go).  The weather here in Southern California has been appropriately windy, rainy, cloudy, sometimes sunny, and chilly but we haven't let that stop us.  I'm celebrating Springtime with this gorgeous cordial I made from Mandarin Orange peels.  See my previous post on how I made Mandarin Orangecello and where I got the recipe that I adapted.  Orangecello is typically sipped as an apertif on its own; here, I created a simple cocktail by adding sparkling water, a squirt of lemon juice.
Happy Spring!

Tuesday, March 20, 2012

Roasted Red Pepper Spread

Grandma Irma got me the amazing Ball Complete Book of Canning a few weeks ago, and I thought I'd dive right in with this scrumptious Roasted Red Pepper Spread recipe in baited anticipation for Spring pepper season. Be creative with how you use this tasty spread, its sweet/savory flavor goes with so many things!  I've used it for bruschetta instead of tomatoes - leeks and fresh basil sprinkled on top (left), tossed it with pasta, spooned it over eggs (shown here in my last post ), & dipped carrots and pita bread in it.  Recipe below, enjoy! xo, AB

Ball Roasted Red Pepper Spread
  • 6 pounds red bell peppers                   
  • 1 pound Italian plum tomatoes
  • 2 cloves garlic, unpeeled
  • 1 small white onion
  • 1/2 cup red wine vinegar
  • 2 tablespoons finely chopped fresh basil
  • 1 tablespoon sugar
  • 1 teaspoon salt
  • 5 Ball® or Kerr® Half-pint (8 oz) Jars with lids and bands
Directions
  1. Roast red peppers, tomatoes, garlic and onion under a broiler or on a grill at 425 degrees F, turning to roast all sides, until tomatoes and peppers are blistered, blackened and softened and garlic and onion are blackened in spots. Remove from heat.
  2. Place pepper and tomatoes in paper bags, secure opening and let cool about 15 minutes. Allow garlic and onion to cool. Peel garlic and onion. Finely chop garlic. Set aside. Finely chop onion, measuring 1/4 cup. Set aside. Peel and seed peppers and tomatoes. Place peppers and tomatoes in a food processor or blender, working in batches, and process until smooth.
  3. Prepare boiling water canner. Heat jars and lids in simmering water until ready for use. Do not boil. Set bands aside.
  4. Combine pepper and tomato puree, garlic, onion, vinegar, basil, sugar and salt in a large saucepan. Bring to a boil. Reduce heat and simmer until mixture thickens and mounds on a spoon, about 20 minutes.
  5. Ladle hot spread into hot jars leaving 1/2 inch headspace. Wipe rim. Center hot lid on jar. Apply band and adjust until fit is fingertip tight.
  6. Process in a boiling water canner for 10 minutes, adjusting for altitude. Remove jars and cool. Check lids for seal after 24 hours. Lid should not flex up and down when center is pressed.                
Pre-roast.  Aren't they pretty?

Sunday, March 18, 2012

Tourist in My Own Town

A long weekend visit from my baby sister and her hubby was a fun reminder of all of the great places you may become immune to when you see them everyday.  Famous bakery Cupcakes Couture in Manhattan Beach, a mere couple miles from my apartment, was one such place.  After the requisite grubby-Mexican slop at a joint in Hermosa Beach for any visitor that lives in a place where good Mexican food is elusive, we headed to Manhattan Beach with no real plan but to meander in and out of shops.  Although I live here in the South Bay, it's not something I have done in a very long time.  We wandered into Cupcakes Couture on a whim and instantly my guests were in Heaven.  Barrie Ann instantly chose the Cupcake Wars award-winning Lemon Blueberry Cupcake, an amazing lemony cake filled with blueberry.  I chose a mini Apple Pie cupcake, described as:  "Vanilla cake with cinnamon apple sauce, topped with vanilla frosting and oatmeal crumble," and Justin crushed a Dulce de Leche cupcake.  Cupcakes Couture is absolutely going to be a go-to place for me for housewarming gifts, client gifts, as well as a place for me to gain inspiration for unique ways to use my jams and jellies.  Cupcakes and jam are a perfect marriage!
Cute sister with the famous Lemon-Blueberry Cupcake
Another must-see place for visitors to the Los Angeles area is the old-school walk-up hot dog stand Pink's Famous Hot Dogs.  Once in awhile, it hits the spot to eat something a bit unhealthy.  For me, it was a great reminder that I still have several jars of jalapeno-onion relish left that I made last Fall, and I began to dream of the myriad condiments I can make at home to create my own amazing dogs at home ~ sauerkraut, mustard, beans...the possibilities are endless.  But who am I kidding - it would be impossible to recreate Pink's, and who would even want to try?

Around the corner from Pink's, of course, is Melrose Avenue, the place to go to people-gawk, find unique kitsch, stop into a friendly bar for a beer and to rest your tired feet from shopping, and to step into another era at the world-famous hat shop Goorin Bros.  (Notice how everything in L.A. is World Famous? ;) )  This was my first visit to Goorin's...and what a shame.  Friendly, knowledgeable, honest service to help you find the perfect hat for your noggin - I'm not a typical hat-wearing girl, and I found one that I loved.
Pink's basic chili dog with fries, Lord of the Rings Dog, and Chili Dog with Kraut
Rolling into St. Patrick's Day, the blustery, rainy, cold weather actually made our choices easier ~ beach was out, Manhattan Beach and Hermosa Beach didn't have their typical lines that we're used to on St. Paddy's Day, and parking was oddly not a problem at all.  We started the day with Green Smoothies (oranges, apples, pear, kale, & spinach) and a hearty breakfast made entirely of fresh, organic ingredients by little ol' moi...in anticipation of libations in our near future.
Flying by the seat of our pants, we ended up at Uncorked, Hermosa Beach, which promised beer tastings in honor of St. Patrick's Day.  Once there, however, my beer-swilling and brewing guests wanted to do something outside of their comfort zone and drink wine.  Wine on St. Paddy's Day?  Yes, please.  One flight later, a text from a friend pulled us back to Manhattan Beach for some green beer (okay, I didn't have green beer because it just looks weird to me) and shenanigans.  We rounded out the weekend at the Home Depot Center for MLS action, Chivas USA vs. Vancouver.  I have little knowledge of soccer, but I love sports, and I'm glad I had the chance to finally experience an MLS game, as it's in my back yard.  Great game, but I somehow missed the winning and only goal by Vancouver.  Not sure how that happened, but I didn't miss the delicious Club Level desserts - open-faced cookie and bananas foster.  Yum.  Sometimes we get caught up in the everyday and forget that the very town we lay our heads provides unique activities, gastronomic discoveries, and inspiration.  I love living in Los Angeles, and I definitely plan on living more like a tourist in my own town. xo, AB
Beers, Grub, and Soccer

Tuesday, March 13, 2012

Jalapeno Pepper Jelly

It ain't easy being green.  Since I made this batch of jalapeno pepper jelly, I've noticed that as I share it with guests and give-aways that people either love it or hate it.  Too bad for the haters, because this stuff is awesome.  It's the perfect, unique thing to give as a housewarming gift or create a fun appie to bring to a party (St. Patrick's Day party!).  It was Grandma Irma who suggested I try making it for the first time a few years ago, and it was Grandma Irma's jalapenos that she grew in her garden in Idaho that went into this jelly - this batch of adorable little 4-oz jars was created with love and bare hands from start to finish. 

As exotic as this jelly looks and tastes, it's actually rather easy to make as far as jellies go.  I'm going to keep a couple secrets to myself as to how I get it to look so beautiful, but here's the recipe for you to enjoy ~ you can find it at surejell.com or on the insert of recipes that come inside a box of pectin. 

Jalapeno Pepper Jelly
1 lb. jalapeno peppers
2 c. water
1 c. apple cider vinegar
4 c. sugar
10 or 12 4-oz. jars...love these cute little quilted ones

Directions:
Stem and halve peppers (I highly recommend wearing gloves and maybe even eye protection.  I know this sounds silly, but when you are heaving and coughing and eyes crying like a waterfall, you won't think it's silly).  Chop or grind peppers. Combine peppers, water, & vinegar in a large pan and bring to a boil.  Reduce heat; simmer, covered, for 15 minutes.  Measure 3 cups of the juice.  You may filter juice only by sifting through a cheesecloth, or you can leave it how it is with jalapeno chunks.  Mix the 3 cups of juice with sugar, bring to a rolling boil.  Add one box of pectin and continue to boil for 2 minutes.  Pour the thickened liquid into sterilized jars, place lids and rings onto jars.  Boil in water bath for 8 minutes.  Makes 5 cups or 10 half cups.  Enjoy with a mellow cheese and crackers, as a spread to cook over chicken breasts, or on a warm, wonderful piece of fresh bread.

Sunday, March 11, 2012

Strawberry ~ Lemon Jam

The fun thing about preserving fruits and vegetables at the peak of freshness is being able to enjoy it weeks or months later when they are no longer in season.  Of course, in Southern California, although strawberry season is roughly March - June, we can get them year-round, especially if you go to farmer's markets to get your produce.  And, of course, lemons are in season practically year-round.  But you get my point.

A couple months ago, I made the crowd-favorite appetizer, Brie Crescent Roll Wrap and used Strawberry-Lemon Jam that I made back in August.  How fun is that?  The lemons used in this sweet and tart jam were picked from a friend's tree in Burbank, and the strawberries were bought at a farmstand somewhere in Utah.  I made this jam prior to starting my blog in September, so at the request of "Anonymous," here's the recipe:

Strawberry-Lemon Jam
4 medium lemons, peeled & coarsely chopped
4 cups hulled, crushed strawberries
6 cups sugar
1 package pectin
8 sterilized 8-oz canning jars w/ lids

Bring strawberries and lemons to a simmer and cook to the desired jam thickness.  Lemons have a lot of water in them, so we want to boil some of it out.  Add sugar, constantly stirring, and bring mixture to a full, rolling boil.  A rolling boil is when stirring doesn't stop the mixture from boiling.  Boil for about 2-4 minutes, adding pectin at the height of the boiling.  Skim foam from the top, quickly ladel into the jars, afix lids and place in boiling water bath for 8 minutes.


Friday, March 9, 2012

Corn Muffins Baked with White Wine Jelly

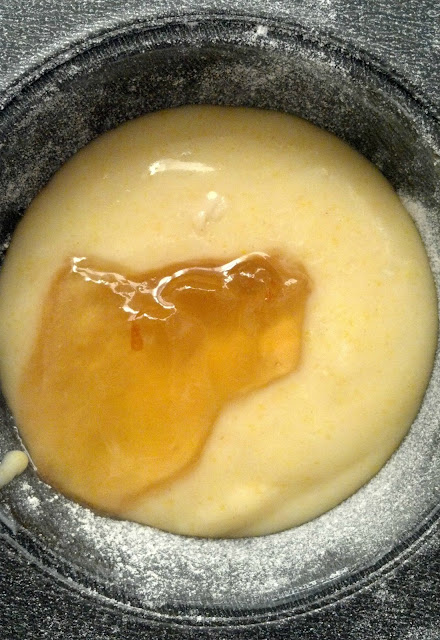
I don't know about you, but I need to eat something a little sweet for breakfast.  I made a dozen corn muffins, and while I love them plain, these were screaming for a little love.  So I gave them love in the form of the white wine jelly that I made back in October.  What a fantastic combo!  I was very happy with this one and it's so easy to make.  Just follow the manufacturer's directions on the corn muffin box, grease and powder your pan, preheat the oven, pour muffin batter in each compartment about 3/4 full, and add a spoonful of the white wine jelly.  Bake for about 10 minutes and - voila! - the perfect morning treat to have with a glass of milk and a piece of fruit. xo, A

Wednesday, February 29, 2012

Easy Blood Orange Recipes ~ Jam, Sorbet, and Smoothies


Is it Summer yet?
I had thought I missed out on blood orange season, when a little ramble through the Hermosa Beach Farmer's Market a couple weeks ago brought me to bags and bags of blood oranges at one of the stands.  Have I ever mentioned how lucky I feel to be in California where we can get almost every type of fruit or veggie we want year-round?  A place where farmer's markets stay open year-round?  I feel very blessed!  Granted, some of the blood oranges were not so pretty (and some were even a bit sour, unfortunately) but that didn't stop me from buying 2 bags of them.

Blood oranges are beauties, orange with a reddish-purple blush on the outside and deep purple flesh on this inside.  The best ones have a hint of blackberry, and are the sweetest type of orange I've ever tasted.

They are in-season in the Winter months, and as you'll see they are wonderful to use in all types of dishes and desserts, but I think they are best eaten in their simplest form.


For a simple, tasty jam, all you need is 4 cups of blood oranges (peeled), 4 cups of cane sugar, and 1 box-or 3 TBSP.-pectin.  Segment the oranges and coarsely chop.  Place in large, non-reactive pan with sugar, bring to a boil, stirring constantly for 5 minutes.

 
Let it reach a rolling boil, add the pectin, stir it thoroughly and continue to boil for 1-2 minutes.  Check the set (this can be done by dropping some of your mixture on a frozen plate - if it films or hardens then it's done) and when it's done, you can place in sterilized jars.  Place jars on the rack in boiling water bath for 10 minutes. This made 6 half-pints of gorgeous jam!
The color is so beautiful, this jam is perfect to use in showy desserts.
For the sorbet (pictured above), you will need:  4 lbs. blood oranges, 1-1/4 c. water, 3/4 c. sugar, and an ice cream maker.  Note:  Use your most beautiful and sweetest oranges for this recipe, that I found on epicurious.com.  This will result in the best taste for your sorbet. 

Zest the peels of several of the oranges; enough for 1-1/2 Tbsp. of zest.  Peel the oranges, making an attempt to get as much of the pith off as you can.  Pick out the seeds.  Combine water, sugar, and zest in pan and bring to a boil.  This will create a syrup.  Add the syrup and orange segments to a food processor (I used an old-fashioned blender) and puree.  Measure out 2-1/3 cups of the puree, cover and refrigerate for 6 hours or overnight.  Next day, pour puree in your icecream maker and follow the instructions from the manufacturer.  In about 5 minutes, you will have about 4 half pints (equivalent to about 10 scoops) of sorbet!  I stored them in Ball plastic containers in my freezer.
Ta-Da!
I used remaining puree for a smoothie - added 3 red chard leaves, fresh rosemary (crushed), and an apple...for added sweetness you could add apple juice but I wanted it to be healthier than that.  This made 24 oz. of smoothie.


Saturday, February 25, 2012

Pickled Brussels Sprouts with Peppers

Jones knows what's good...
I used to feel sorry for Brussels sprouts, until I realized that in this new world of "artisan restaurants," American gastropubs," and  "local ingredients," that somehow Brussels sprouts have become one of the new sexy foods.  Hipsters have helped to convince us all that Brussels sprouts taste good! 

Personally, I do like Brussels sprouts, even though I never had them until a few years ago.  In fact, I never knew what they were.  Grandma Irma told me that my Little Daddy hates them, so we never had to eat them.  More recently, I've had Brussels sprouts in different iterations at local restaurants and in the Bay area, and I happen to really like them!  A few shipments ago, I also received some in my CSA box and steamed them with bacon.  Yum. 

I found this fun recipe on tastykitchen.com, my adaptation is below.  Minor changes based off of what I had in my kitchen.
For Brine:
8 c. water
1 c. white vinegar
1 c. red cider vinegar
1/4 c. rice vinegar
2 Tbsp. pickling spice
1/2 c. sea salt, ground
1 c. sugar
1 head fresh dill
2 cloves garlic

For Jars:
6 half pint jars
1 lb. Brussels sprouts, large ones cut in half
6 heads dill
3 red jalapenos, sliced in half
4 Tbsp. pickling spice
3 heads garlic, sliced in half

Bring all brine ingredients to a boil.  In sterilized jars, stuff sprouts in jars, and one each of dill heads, jalapeno halves, and garlic halves in each jar.  Separate pickling spice in 6 equal portions and place in each jar.  Pour brine in each jar, leaving 1/4" head space.  Place jars in boiling water canner for 10 minutes.  Since peppers are sliced open, these sprouts will be extra spicy.  Fun ways to eat these spicy sprouts:  sautee in their own juices for a side dish, roast until blackened on the edges and serve as an appetizer, chop in 1/2" pieces and toss in a salad - you can use the brine with high-end olive oil as the dressing, or use as a garnish in a martini or Bloody Mary.  How would you eat them?  xo, AB