Tuesday, January 31, 2012

Mandarin Jelly Recipe

In my previous post on mandarin orangecello, I referred back to my post on my SIL TJ's orange jelly. What I love about orangecello/liqueur recipes (as well as marmalades) is that no part of the fruit gets wasted.
For this sparkly, scrumptious jelly, I used the orange jelly recipe, but with the mandarin oranges I peeled for orangecello as opposed to navel oranges, and also with a variation in the methods.  There are usually more than a couple ways to come up with the same or similar jelly, and I wanted to show that you can use the entire fruit when working with citrus. 
After peeling the Satsuma Mandarins for the orangecello, I created the juice for the jelly with the flesh.  First, since the peel was already removed, the easiest and least messy way of juicing the oranges was to puree in the blender.
Next, I used a strainer to filter the juice from the membrane and pith.
And for an even clearer and more beautiful jelly, I strained again using cheesecloth over the strainer.
From here, use THIS RECIPE to create this:
This made 6 half pints or 3 pints.  Delicious!  Note:  About half of the mandarins I used were slightly overripe.  This made the jelly extremely flavorful.  xo, AB

Saturday, January 28, 2012

Sambal Oelek (Hot Pepper Paste)

Holy canolli!  This stuff is amazing!  Similar to sriracha (aka "rooster sauce"), sambal oelek is a paste made from peppers, simple and tasty.  It is a commonly-used condiment in Indonesia and Malaysia, and can be used in cooking.  I love rooster sauce, so I knew I would love this, and after finding gorgeous organic habaneros at Whole Foods, I couldn't wait to try it.  Basic sambal oelek is simply chillies, vinegar, and maybe some salt and lime juice.  You can mix it up by adding garlic or other flavors, whatever you like.
Sambal Oelek

1 lb. whole habaneros
2 c. white vinegar
1/2 c. rice vinegar
Salt to taste
Juice from one lime

Wash and de-stem the habaneros.  Place in food processor and grind.  Place all ingredients in a wide-bottomed pan, bring to a boil.  Lower to a simmer and cook for 30-40 minutes, or until the consistency is uniform. The mixture won't be watery and the peppers won't be chunky.  This made 3 half pints; I had on-hand 1 pint jar and 1 half pint so I used that.  Boil in water bath for 10 minutes to seal the lids.  Scroll to bottom for a word about working with peppers. 

*Warning*  I recommend wearing gloves, and if you are particularly sensitive, I'm not kidding when I say it would also be smart to wear a surgical mask when you grind the peppers down.  I was sneezing, coughing, and dry heaving all at the same time.  Be careful and at the very least, wear gloves. xo, AB

Friday, January 27, 2012

Mandarin Orangecello; Fun & Boozy

I've received a wonderful, bountiful gift from my CSA box...mandarin oranges 2 shipments in a row.  I saved a few for eating fresh, but I wanted to try something special.

Using 14 organic Satsuma Mandarin Oranges of varying sizes, I have attempted Orangecello using THIS RECIPE from goodcocktails.com.  My only substitutions were that I used blueberry-infused vodka for an extra fun flavor (I hope); and, of course, the Mandarin Oranges as opposed to navel.  I used the oranges for jelly...using THIS RECIPE by my SIL TJ.  Will post about the jelly later.

Peel the oranges with a paring knife, avoiding the pith.  My oranges proved to be difficult to peel with a knife because the skin pulled away from the fruit very easily, so I peeled by hand and scraped the pith off of the peel with the knife.  This took me about 45 minutes.  I might be a little bit Type A about this type of thing...you want some pith with your peel, just not too much or your Orangecello will be bitter.

Now, you are ready to place the peels in an airtight jar and pour the vodka of your choice (100 proof).  Seal the jar and wait...for 4-6 weeks.  I will be checking back in with a quick post once my orangecello is ready!  I hope this is as dangerous as it sounds, yee-haw!  xo, AB

Saturday, January 21, 2012

Carrot-Apple Jam & Jam-Marinated Pork Chops

So what do you do with carrots when you get a bunch of them in your CSA box and you've just about had your fill of them in stews, pot pies, salads, and as a snack?  I made jam. :)

Coral goodness!
You may not think of carrots as being your choice ingredient for jam, but their natural, subtle sweetness is actually really fun to play with.  And since I had just shy of 3 cups of carrots once I grated them, I added a couple green apples for additional bulk.  The result is a perfect balance of sweet and earthy root flavors.  I spread a little on my toast the morning after I made the jam because it looked so pretty I couldn't wait to try it!
Carrot-Apple Jam
3 c. grated carrots (about 8 medium carrots, grated)
2 green apples, diced in half-inch cubes
3 c. white cane sugar
1/2 c. freshly squeezed lemon juice (approx. 2 med. to large lemons)
Grated zest of 2 lemons
3 Tbsp. low-sugar pectin
Prepare 6 half-pint jars and lids by sterilizing.  Bring canning water bath to a boil.

Combine all ingredients except pectin into large, wide pan.  Bring ingredients to a boil.  Add pectin, continually stirring mixture.  Boil for 1-2 minutes, lower to a simmer.  Check set.  Turn heat off, ladle mixture into sterilized jars.  Secure lids, using jar grip to place jars onto rack in water bath.  Boil for 10 minutes.  Turn heat off, remove jars from water bath and allow to set to cool and seal. 

So...what to do with Carrot Apple Jam? I am a pork lover, and am trying to perfect various ways of cooking it, so I thought that this jam would be perfect to try on pork chops.  I must say that this turned out really yummy - garlic + pepper+ carrot-apple jam + pork chops = success!

Carrot-Jam Glazed Pork Chops

2 Thinly-Cut Pork Chops (1/4")
6 oz. Carrot-Apple Jam
3 Tbsp. Olive Oil
1 garlic clove, thinly sliced and lightly smashed
Black Pepper
Table salt

Don't worry - this is the "before" picture.
Sprinkle pepper and salt on both sides of each pork chop.  Coat the pork chops in 2 Tbsp. olive oil, garlic, & jam (pictured, above).  Cover in plastic wrap and chill in fridge for 1-2 hours, or overnight to really let the flavors penetrate the meat. 

Pour remaining Tbsp. of olive oil in skillet on medium heat.  Place pork chops in olive oil, cook for approximately 3-4 minutes on each side.  Keep a close eye on the 'chops and cook through.  Place pork chops on plate, pour any remaining juices and fruit over the meat.
Tender, flavorful, perfect mix of sweet and savory!
Serve with a side salad.  I used Romaine lettuce, thin slices of extra apple, any remaining grated carrot, and pomegranate seeds.  Using fresh versions of the marinade ingredients creates a nice complement to the pork chops.  Add rice vinegar and olive oil as dressing. xo, AB

Tuesday, January 17, 2012

Mango Salsa!

Oh, I am so excited to share this recipe with you!  This is a tested recipe from the National Center for Home Food Preservation, with my own little twist.  Chips and salsa is one of my favorite snacks.  It's low-cal, no fat, full of fiber and vitamins, and tasty.  I have been seeing more mangoes (which are typically in season in Mexico in early Spring) at various places so I thought I'd try a fun mango salsa.


Since I began this blog, I have gone back and forth between using tested recipes from trusted sources, as well as creating my own recipes.  Because I have never worked with mangoes for canning, I felt like I should do a little research.  Turns out, you can't simply take your own favorite recipe and can it, especially with mangoes.  They are low acid fruit and require the right amount of acidic ingredients (lemon juice or vinegar) to make it safe for canning.  Also, you need to use unripe mangoes (green, tough to the touch) to ensure there won't be any bacterial growth in your final product.  For a great resource on canning with mangoes and some other fun recipes, click here:  National Center for Home Food Preservation's Sensational Salsas

Since I have my own ideas of what should be in a mango salsa, I decided to use this trusted recipe, and then added my own embellishments after I canned it and was ready to eat.


For this recipe, you're going to need a water bath canner, jar grip, 6 half pint jars, and a slotted mixing spoon.

Cilantro Mango Salsa

6 cups diced unripe mango (about 3 to 4 large, hard green mangoes)*
1½ cups diced red bell pepper
 ½ cup finely chopped yellow onion
 ½ teaspoon crushed red pepper flakes
2 teaspoons finely chopped garlic
2 teaspoons finely chopped ginger
1 cup light brown sugar
1¼ cups cider vinegar (5 percent)
½ cup water
*sprinkle of black pepper (not in original recipe, but I think it tastes better!)

Caution:  Handling green mangoes may irritate the skin of some people in the same way as poison ivy. (They belong to the same plant family.) To avoid this reaction, wear plastic or rubber gloves while working with raw green mango. Do not touch your face, lips or eyes after touching or cutting raw green mangoes until all traces are washed away.

Procedure:  Wash and rinse canning jars; keep hot until ready to use. Prepare lids according to manufacturer’s directions.  Wash all produce well. Peel and chop mango into ½-inch cubes.  *For instructions on an easy way to dice your mangoes, scroll to bottom of this post.

Dice bell pepper into ½-inch pieces. Finely chop yellow onions.  Hot Pack: Combine all ingredients in an 8-quart Dutch oven or stockpot. Bring to a boil over high heat, stirring to dissolve sugar. Reduce to simmering, and simmer 5 minutes. 

Fill hot solids into clean, hot half-pint jars, leaving ½-inch headspace.  Cover with hot liquid, leaving ½-inch headspace. Remove air bubbles and adjust headspace if needed. Wipe rims of jars with a dampened, clean paper towel; apply two-piece metal canning lids.  Process in a boiling water bath for 10 minutes.

After sealing:  Once you are ready to eat your salsa, you can add ingredients fresh.  For one jar, I added the following:
1/2 c. chopped , fresh cilantro
Light sprinkle of salt
Light sprinkle of black pepper
Squeeze of fresh lime juice
Serve with tortilla chips

A touch of green from the cilantro and a few black pepper specks not only provides additional flavor, but also add a contrast in color to make it more visually appealing.

Slicing & Dicing Mangoes

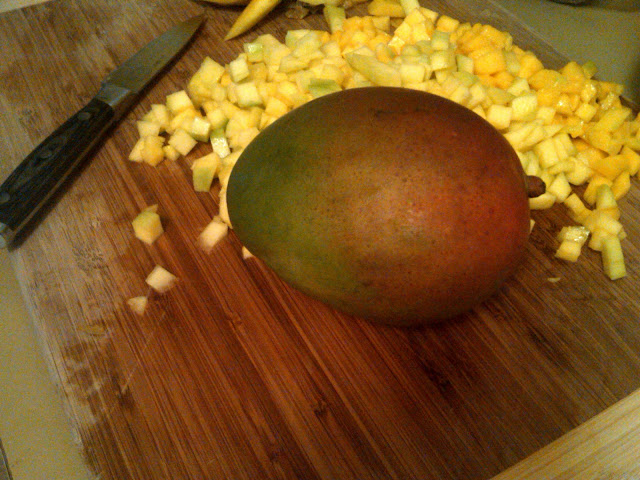
Peeling mangoes can be a bit of a pain, but the reward is high.  I love mangoes, so it's worth it!  This is a method I've found to be easiest for me, although I would love to hear if you have a better way.  I've never been able to the "flower" method...so don't tell me that way, teehee.  First, I peel the mangoes with a potato/carrot peeler.  It comes off quite easily, in smooth, long strips.

Then, I chop off the very bottom so that it is flat.  This allows you to stand the mango on end without it wobbling on your cutting board.

Next, I slice long slices from top to bottom, working around the seed.  I find it difficult at times to know where exactly the seed is, but if there is no give for your knife, chances are that is the seed.  I get as much flesh as possible without getting tough "bone" or stringy flesh.

At this point, I lay the strips flat on the cutting board, julienne in 1/4" strips, then turn to dice.  The NCHFP recipe says to cut the mango in 1/2" cubes, I did quarter inch.  I don't know about you, but I don't want giant pieces in my salsa.  1/4" dices are perfect for dipping.  xo, AB

Sunday, January 15, 2012

Brie Crescent Roll Wrap with Strawberry Lemonade Jelly

You may have noticed that a recurring theme in my posts is to write about the jams, jellies, and canned goods I make, as well as give you ideas on what to do with them.  This is just another fun and simple way to enjoy jams and jellies, and is a great appetizer for any get-together.  You can use any flavor of jam or jelly you'd like; I chose Strawberry Lemonade Jelly that I made this past Summer.

Here is the recipe for Crescent Roll Wrap, which I got from a friend a couple years ago, and a link to the original recipe and video on pillsbury.com
1 Pillsbury Crescent Roll Log
1 triangle of brie (no skin)
2 large spoonfuls of Strawberry Lemonade Jelly  (or any Jam or Jelly of your choice)
Apple or Pear slices
Dinner crackers

Directions:
Preheat oven to 350.
Roll out dough, and push together the dough segments so you don't have any holes.  Place the brie in the center of the dough, and dollop two large spoonfuls of jam over the brie.  Fold up the dough, completely covering the jam and brie.  (I turned the dough over, because I thought it would cook up to look more aesthetically appealing than the pinched side).  Place the dough on an ungreased cookie sheet, place in the oven.  Bake for 20-25 minutes.  I suggest setting a timer for 15 minutes and monitoring it closely thereafter to get the dough perfect.  Serve with apple or pear slices (I used pear) and crackers.  xo, AB


Saturday, January 7, 2012

Friends 'n Family: Tara Jo's Orange Jelly

If this adorable picture of my niece isn't enough proof that this jelly is absolutely delicious, then I don't know what is.  It makes me want to jet pack up to Utah and give her a squeeze and then steal her jar of jelly to eat myself.

SIL Tara Jo generously shared her recipe with me so that I can recreate this jelly.  I am much more of a fan of this than using oranges for marmalade.  This is a simple recipe, the most time-consuming portion is to squeeze the fresh juice.

This is a great time of year to make Orange Jelly or other derivatives of orange and other citrus fruits, because they are in-season, and in January are really the only local fruits that are in season.  In-season means they will be tastier than usual and a little cheaper, too.

This is great on a little French toast (shown below) or on a spoon like Bryar here above!
Tara Jo's Homemade Orange Jelly

3 1/2 c. freshly squeezed orange juice (approx. 8-10 medium to large ripe oranges)
1 Box pectin (pink box of SURE-JELL for low sugar)
5 c. sugar

Juice your oranges the old fashioned way with a juicer and some elbow grease.  Strain the juice with a cheesecloth or a flour bag cloth (the flour cloth is slower but effective).  This step makes your jelly clearer and prettier.

Pour the juice into a large pot, add the pectin packet and 1/4 c. of your 5 c. of sugar.  Bring to a rolling boil, then add the remaining sugar.  Return to a rolling boil, stirring constantly for 1 minute.  Skim off any foam. 

Ladle the mixture/jelly into sterilized jars (baked in the oven at 225 for 20 minutes.  The jars don't need to be sterilized if the jelly you are making is going to be boiled in a water bath for 10 minutes or longer). 

Place sterilized lids (sterilize flat lids by simmering in about a 1/2" of water) on jars, tighten the rings over the flat lids.  Place the jars on a clean, dry cloth and let sit overnight.  Check the lids the next day to ensure that they sealed overnight.  xo, AB & TJ


Cutie Pie!

Tuesday, January 3, 2012

Beautiful Jar Art

 While preserving foods and creating jam and jelly are fun and can stand alone as works of art, what do you do with your used jars when they can no longer be used for canning?  Jars can be used over and over again for canning, but after a certain point, if you notice nicks, scratches, chips, or clouding, you may want to find another use for your jars.  Here are some ideas for beautiful ways to recycle your used jars.  There are so many fun crafts you can do, but these were a few of my favorite ideas that I found as I searched the web for jar art.  Perhaps these will inspire you to create your own pretty art with jars.

These delicate knitted cozys above allow just enough light to shine through to create ambience perfect for a cocktail party or an outdoor soiree.  Since one of my NYE resolutions is to learn how to knit, perhaps by next year I'll be making my own Ball Jar votive-holder cozys!  Click here to purchase the knitting pattern on etsy.com

These blue-toned antique jars have a rustic, outdoorsy feel that I love for indoor decor.  This is being sold as a photograph (not the actual jars) on etsy.com - just go to etsy and type in Ball jars, and it pops up.  The direct link will also take you to other iterations of arrangements of these beautiful jars.  A 5X7 photograph is just $12.00 from the seller, Miss M Photography.  I may just buy some myself for my kitchen.

How beautiful is this pastel jar chandelier?  The colors, the creativity, the seemingly simple look of this...I LOVE this.  I want one.  And I can have one for just $130.00 - and so can you - by clicking here.

Anybody who's been in an out-of-the-way (or not so out of the way, as it may be) dive bar in Idaho has most likely drank a beer from a Mason jar.  Here is a whimsical, pretty take on using old canning jars for a similarly practical purpose (quenching thirst) while also looking perfectly pretty for a backyard barbecue or wedding reception - appropriate since a web search took me to yummyweddingfood.com, where I found the image.  They note under the same photo on their web site that they found it on yet another web site that didn't credit the owner of the photo or the creator of this wonderful idea!  So, I can't credit it, either, but I'm happy to be passing on this idea to you.

Do any of you have ideas on how to use canning jars for other purposes? I'm thinking this is going to be a future theme in my future kitchen that I hope to have some day. :) xo, AB


Sunday, January 1, 2012

Picadillo Mexicana with a Healthy Twist + Escabeche

Picadillo with my very own escabeche
I love picadillo - it's fast, easy, healthy, and you can be creative with the ingredients of your choice.  Grandma Irma always makes this with ground beef, green bell peppers, onions, carrots, garlic, and finishes it off with fresh salsa.  I made this on the fly yesterday, and included fresh tomatoes and spinach to up the vitamin content (and because I have spinach coming out of my ears due to my CSA delivery).  Keep in mind I usually just make this with whatever I have in the fridge, and I rarely measure it all out so other than the ground beef, tomatoes, and olive oil...just use what you have, it's not too scientific!  It takes about 20 minutes to make; my only wish is that I had fresh, homemade tortillas - I've never quite got the hang of that. 

Picadillo with a Healthy Twist
1 lb. Ground beef, 98% lean, or ground turkey
1/3 Large onion, chopped (about 1 c.)
1 bunch Small carrots, diced (1-2 c.)
1 bunch Radishes, diced (about 1/2 c.)
1 box Plum tomatoes (fresh), I cut off the ends and slice each one in half
Entire bunch of Spinach leaves, cut ends and loosely chop (about 3 c.)
Pickled jalapenos, aka escabeche, 1 for each burrito/serving
Flour tortillas, 1 pack of 8
1 Tbsp. olive oil
Salt, black pepper, & cumin

Saute onion, carrots, and radishes in olive oil until onions are slightly softened.  Add ground beef, continue to saute and stir until almost all of the beef is browned.  Add spinach leaves, stir into mixture.  Lastly, add the tomatoes, stir to distribute.  Add salt, pepper, and cumin spice to taste and stir in.  Place the lid on the pan and cook for about 2-3 minutes more to ensure beef is completely cooked and to keep in moisture.  Spoon your picadillo onto a large tortilla, tear the stem off of a canned jalapeno and break up with your fingers onto the picadillo.  Fold and eat - presto!  Makes about 6 servings. xo, AB