Friday, May 11, 2012

Urban Farming; Tomato Plant Week 3 & "Suckers"

Excuse me while I put on my farmer hat...  Okay, now I can get started:  Don't think I have forgotten to tell you about the progress of my tomato plant (s).  Today, I have chosen to focus on just one of those plants.  Because the other one isn't doing so well.  I originally planted it in a small pot I wasn't previously using because I didn't have enough large pots.  And 3 weeks later, the big-potted plant is flourishing beautifully, while the small-potted plant is struggling.  Poor thing!  Here's a picture of the one that's doing really well:
Roma Tomato Plant, Week 3
Something I have learned about tomatoes is that they grow what are called 'suckers.'  They look harmless, and are pretty harmless from what I've read, except for that they can make the plant messy and result in smaller and fewer fruit.  Here are a few photos to show you what a sucker is:
Okay, so ignore the fact that I needed a manicure when I took these pictures and pay attention instead to where my finger is pointing.  From the main stem of the plant, branches naturally shoot out.  The 'suckers' are the little, secondary shoots that grow in the groove created by the stem and branch.  Pinch these off and toss them.  Fruit can and will grow on these, but overall your product will be smaller and weaker, and the yield will be less because these suckers are competing for water and nutrients.  Save yourself some trouble and pinch those suckers!!
Update on my peppers:  They are doing equally as awesome as the tomatoes but I find that they need a little more water than the tomatoes do.  Perhaps this is because I planted 3 different plants in one pot, but I notice the leaves wilting about a day or two before the tomatoes.  I just look for a little droopiness and pour about a quart of water in the pot, directly on the soil.  xo, AB
Beauties!!

Thursday, May 10, 2012

Strawberry - Mango Jam

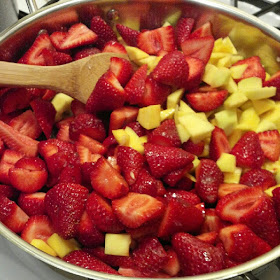
Strawberry season is in full force and I found mangoes 4/$1!  Naturally, visions of strawberry-mango jam jars danced in my head.  This is really a simple jam, and I plan on making it again very, very soon but switching up the mango:strawberry ratio.  Ah, so yummy BUT I would like the mango flavor to shine a bit more.

Before you get started, a couple tips when working with mangoes:

1.  They are in the same family as poison oak, therefore, some people are allergic to the touch.  Wear gloves just in case.
2.  They are low-acid fruit, so use a tested recipe.  Also, mix ripe with unripe fruit.

For more information on working with mangoes, see my previous post on Mango Salsa for tips and a link to trusted sources.

Strawberry - Mango Jam
Makes 12 half-pints

1 large carton (3 lbs.) fresh strawberries, stemmed and hulled
2 large mangoes, diced
5 cups sugar
Juice from one large lemon
1 box powdered pectin


Prepare 12 half-pint jars, lids, and rings, as well as your water canner.  Crush strawberries, leaving large chunks to your liking.  Combine strawberries, diced mangoes, pectin, and lemon juice in large, wide-bottomed pan over medium-high heat.  Stir continuously, and add sugar, slowly and while stirring, once the juices start to seep out of the fruit.  Bring mixture to a full rolling boil and cook for 3 minutes.  Ladle carefully into jars, cleaning the rims with a hot wet cloth, and quickly afix the lids.  Boil jars in water canner for 10 minutes.  This jam is a gorgeous orange-red and tastes like Spring! xo, AB 

Lemon Curd - Easy Peezy!

Lemons, lemons, lemons!  A couple months or so ago, I thought I was sick of citrus, but that was before I realized all of the wonderful things you can do with lemons!  I drive by my neighbors' amazing lemon trees dotted with dozens of lemons rotting on the branches, and it kills me.  One day (soon) I will be knocking down their doors begging for fruit.  Watch for a future post with more lemon recipes when I get the guts to do this.  I usually buy my lemons, but recently asked friends with yards if I can pick from their trees.  I'm running out of friends.
For now, I want to share this fun little gem of a recipe because it tastes so darn good.  I was always under the impression that lemon curd is difficult to make so I had never tried it (and also, the name "curd" just sounds kinda gross, anybody with me on this?  Can't we call it cream or something more tasty?)...maybe it was beginner's luck, but I didn't think it was that hard.  I adapted my recipe below from the following recipe on finecooking.com, and it turned out amazing.  I tried this a second time to make sure I wasn't getting cocky and to know that I could reproduce my work, and it turned out delicious once again.  This doesn't happen for me all that often, so let me have my moment!  A couple tips that I think made this work were that I used egg yolk only, and was very careful to get as much egg white out as possible.  This helps to create a silky texture because egg whites can cause a cottage cheese-like consistency when cooked and it doesn't add to the flavor that much (in my opinion).  Using just the yolks also creates the sunshine-yellow color I was hoping for.  The second thing I was very careful to do is exercise patience.  I cooked the curd on very low heat in a large pan, stirring with a wooden spoon, and never once stopped stirring.  No double boiler, no straining of the curd, nothing fancy, just cooking really slowly.  Additionally, I used a wooden spoon with a flat bottom (which I use for all of my jellies and jams as well) to avoid sticking on the bottom of the pan. This took approximately 10 minutes.  Recipe below!!

Misfit Lemons
Simple Lemon Curd
Makes 2 cups - can easily be doubled or tripled
Prep time:  20 minutes (squeezing juice takes the longest)
Cook time: 10-15 min

4 egg yolks
2/3 cup freshly-squeezed, strained lemon juice - about 2-3 lemons
3 oz. unsalted butter, melted
1 c. sugar
1 Tbsp. lemon zest

Lightly beat the egg yolks for consistency of texture; don't whip.  Combine egg yolks, lemon juice, and butter into a bowl.  Pour mixture into your large, heavy-bottomed pan on low heat and begin stirring immediately.  Continue to stir as you slowly pour the sugar into the mixture.  Never stop stirring, add in the zest.  Eventually the mixture will thicken and you will see it sticking to your spoon.  Pour into your choice of container; can be refrigerated up to a week.  Use in tarts, pies, on its own, or spread on toast or pancakes.  Delicious!  xo, AB